Lets learn how to Uninstall Skype for Business on Window 10? Three Simple Steps to Remove Skype for Business on Windows 10. You may be familiar with the Uninstall Skype Business feature, but you may find it challenging to use often. This post will walk you through the process of disabling and uninstalling this Windows 10 feature.
Skype for Business
Users of Skype for Business can communicate via text chat, audio conversations, video calls, and online meetings thanks to its user-friendly design. Skype for Business can be accessed on campus or from any location with Internet access, using almost any Windows computer or mobile device (Lync on Macs).
Skype for Business on Window 10
Formerly known as the Microsoft Lync Server, Skype is a unified communications platform that combines popular corporate communication and online meeting channels, including instant messaging, presence, video conferencing, etc.
To put it another way, you may utilize this feature to stay in touch and take proactive measures with your colleagues. With this feature, interacting with people in daily life is simple. Luckily, Skype frequently causes issues for the business, including taking up a lot of disk space.
You can, however, choose to uninstall Skype from your computer or turn it off. Additionally, this post offers some workarounds for disabling or uninstalling Skype for Business.
Remember that if you do not remove the Microsoft Office reset, you will not be able to uninstall Office 365 Skype from your device.
How do you uninstall Skype for Business from your PC?
You shouldn’t be concerned if you can’t uninstall Skype. To uninstall Skype from your PC, there are three options listed below.
First Method: Turn off via Skype Settings
Please use the steps listed below to uninstall Skype for Business and disable this feature so that it doesn’t start:
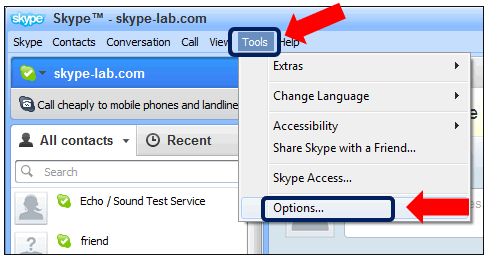
Step 1: Launch Skype for Business’s Settings, go to the Tools tab, and choose the Options option.
Step 2: From the left side, choose and uncheck the personal option. Launch the application immediately upon logging into Windows and launch it in the forefront.
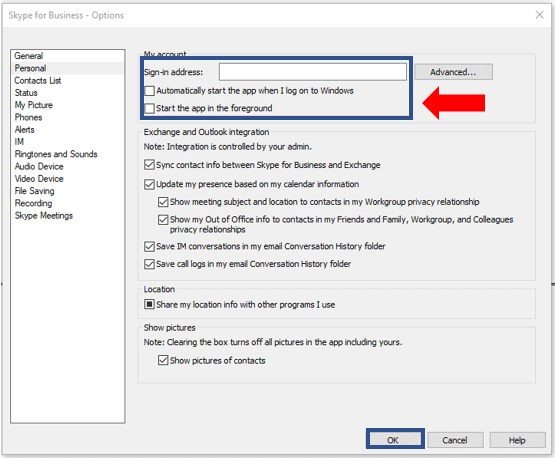
Step 3: To validate the modifications, click the OK button.
Step 4: Click the Settings button once again.
Step 5: Click on File and Close.
You will be able to remove Skype for Business from your computer by following these instructions.
Method 2: Use the Control Panel to uninstall
Using this technique will require you to delete all the profile cache for your Skype account before using the Control Panel to uninstall it from Windows 10.
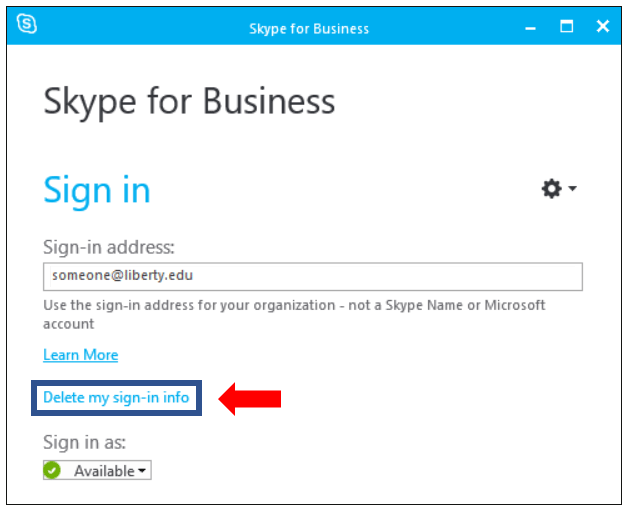
Step 1: launch Skype for Business and log in.
Step 2: Select the option to “Delete my sign-in info.”
Step 4: Select Programs and Features from the Control Panel. Modify or uninstall software.
Step 5: Select Skype for Business
Step 6: Click Uninstall
Method 3: Use the Registry Editor to uninstall
We explain how to use a registry editor to remove Skype Business in this way. Please follow these steps:
- Press the R key and the Windows icon at the same time.
- Upon receiving a run box
- Enter regedit in this field.
- Select your Registry Editor window by clicking the OK button.
- Go to the Edit button in this window and choose the Find option.
- Enter Skype for Business in the search field.
- Select “Find Next” from the menu.
- To eliminate every search result, use the right-click menu.
Frequently Asked Questions:
By “Skype-to-Skype” conversation, what do you mean?
We refer to a direct connection between two Skype clients for voice, video, chat, and/or desktop sharing as “Skype-to-Skype communication.” Skype-to-Skype communication doesn’t make use of public phone networks or campuses.
Will calls made using Skype for Business be able to be made over the UoS WiFi network?
When using real-time audio and video applications, we always advise using a wired connection rather than a wireless one because the former will offer a far more constant and dependable experience. Nonetheless, if there is enough signal strength and available capacity, Skypevoice and video can function effectively over wireless networks.
Which software is required?
The necessary Skype software will be sent to your UDS machine by IT Services; installation instructions are available here. You will need to look for Business Skype in the relevant app store if you need the software for your mobile device. More details about setting up the Skype for Business app on your device may be found here.
Can I use a mobile device to access Skype?
Windows, iOS, and Android smartphones and tablets are all compatible with the Business Skype mobile client. The Business Skype mobile client must be downloaded from the device’s official app store. Visit Microsoft’s Business Skype website to learn more about Skype for Business on mobile devices.
How can I access Business Skype ?
When logging in with a UDS device, the system ought to do so automatically. When using the Business Skype client on a personal device or a mobile device
What hardware is required to use Business Skype?
Although built-in speakers, microphones, and cameras can be used with Business Skype , additional speakerphones or headsets designed specifically for Skype for Business are advised for speech and video communication. The Recommended Devices for Business Skype page lists devices that are optimized for Business.