Although the one-inch default margins on both sides in Google Docs work well for many projects, you may want to adjust these values. Users of the application can change the amount of white space that appears at the top, bottom, left, and right of the page. This tool can assist you in meeting the criteria for papers, projects, and resumes set out by your teacher or company. In this article, you read all about how to change margins in Google Docs.
In this post, we share the instructions for many approaches that can help you learn how to change margins in Google Docs. Please check Zintego.com
Modifying Margins
To get things exactly right, you may occasionally need to change the margins in your document. You may customize them in two distinct ways using Google Docs. This tutorial will teach you how to set the margins using the Page Setup dialog box and the ruler in your project.
Margin adjustments in Page Setup
Navigating to the Page Setup dialog box is one method to adjust the margins.
- Click File, then choose Page Setup.
- Now, by selecting a box and entering a new measurement, you may alter each margin.
- When you’re finished, click OK.
- One inch is the default margin on all sides. After adjusting the margins, you may alter them by selecting Set as Default.
- When you start a new document, the default margins are applied. They won’t have an impact on the current papers.

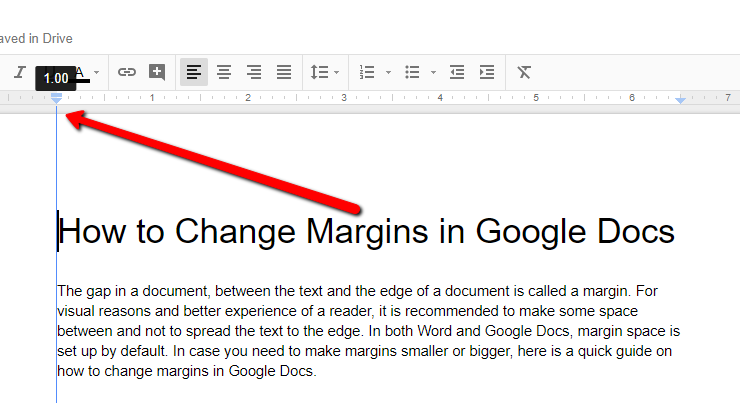
Using the ruler to adjust the margins
Using a ruler is an additional method of how to change margins in Google Docs.
- Click View and choose Show Ruler if you are unable to see the ruler above and to the left of your page.
- Reach for the gray area on each end of the ruler.
- The pointer will change to an arrow.
- Modify the margins by clicking and dragging.
Keep in mind that changing the margins will impact every page in your manuscript. You are unable to define distinct margins for individual pages at this time. Even so, you could find this function helpful if you need to alter your manuscript.
In Google Docs, use “Page setup” to change margins.
The steps to how to change margins in Google Docs. are as follows:
1. Start your file.
- Open the Google Docs website in your favorite web browser. Choose the document that you wish to modify. By choosing the “Blank” option located in the upper-left corner of the screen, you may begin working on a new document. As an alternative, you might use the search bar to locate an existing document or scroll down to see recent papers. Click on the document to open it if you want to make changes to its margins.
2. Click on “Page setup.”
- Once the relevant document has been opened, click “File” from the toolbar. With many tabs, the toolbar is located at the top of the page. The first tab from the left side of the screen is the “File” menu, which offers choices to save, move, and print the document.
- This tab opens with a drop-down menu when you click on it. Select “Page setup” from the option at the bottom. It could need scrolling to locate. When you click this button, a new window opens.
3. Modify the margins.
- You can adjust your margins after the “Page setup” panel opens. The window’s right side contains the margin settings. By selecting the text box next to the margin you’d like to edit and providing the necessary dimensions, you may alter the document’s top, bottom, left, and right edges.
- Unless you or a partner have modified it before, the default value is one inch for each side. To make your changes take effect, type in the new margins and click the “OK” button at the bottom of the window. You can continue tweaking the margins if they are still off. Click “Set as default” and then “OK” to exit the window if you want the margins you selected for this document to be used for future documents.
On a mobile device, how to change margins in Google Docs
The following procedures should be followed if your device is capable of allowing you how to change margins in Google Docs, which is only possible on specific mobile devices:
- Get Google Docs open.
- Either choose the document you wish to modify or start from scratch.
- In the document’s lower-right corner, tap the pencil-shaped “Edit” symbol.
- In the upper-right area, tap the three-dot “Menu” symbol.
- Select “Page setup.”
- Click “Margins.”
- Select “Default,” “Wide,” “Narrow,” or “Custom.” If you would like to change the margins, select the corresponding measurement by tapping the number on either side of the document.
- In the upper right corner, tap “Apply.”.

How to change margins in Google Docs using Ruler?
In Google Docs, you may use the ruler to change margins as follows:
- Select your document by opening Google Docs: Open Google Docs with your favorite web browser. Choose an already-existing file or start a fresh one. It might be advantageous to use a document with text already on it for this strategy. If you want to begin a fresh document, include some placeholder text so that you have something to look at while adjusting the margins.
- Locate the triangle and take out the ruler. Find the ruler once you’ve opened your document and there is text on the page. This tool, which has numbers and measurement marks, is located toward the top of the page, beneath the settings bar. You may adjust the text’s margins and indents with the ruler. It also aids in making sure the text, graphics, and graphs are all aligned. Find the blue triangles on either side after you’ve located the ruler.
- Use the triangles to adjust the margins. Drag the left triangle to the left or right by clicking on it. The left-side margin is adjusted with this action. Hovering over the ruler region causes the cursor to shift to a black arrow. To adjust the margin, let go of the mouse. To change the margins on the right side, repeat the same process with the triangle on the right.
- Adjust the margins on top and bottom: Next, make changes to the page’s top and bottom margins. On the left side of the screen, locate the vertical ruler. Google Docs’ vertical margins are shown as a solid black line rather than as triangles.
Why should you change margins?
It may be necessary for you to adjust the margins in your document to follow project guidelines. For example, lecturers frequently demand specific margins for a work. For a project or resume, you can additionally wish to fulfill the margin standards set forth by the company. Selecting particular margins might make your project look more professional or follow industry standards, even if there are no requirements for the project you’re working on.
Additionally, after converting an external document to the software, you may want to change the margins. It may be required to adjust the margins to guarantee that the document can be read after conversion.
Advice for how to change margins in Google Docs
How to change margins in Google Docs, take into account the following suggestions:
- Resolving the paper size issue: When printing on “A4” paper, the default paper size is “Letter,” which might lead to erroneous margins. To correct this setting, select “File” > “Page setup” and adjust the paper size to “A4 (8.27″ × 11.69″).”
- Printing as a PDF: You can avoid some mistakes that alter the page margins by printing your work as a PDF file. To convert the document to a PDF, click “File,” “Download,” and “PDF Document (.pdf).”.
- Sharing a document: You may send a copy of a document to a manager or coworker if you’d prefer them to see it but not edit it. Choose “Make a copy” from the “File” menu to bring up a window with copying choices for the document.
- Gain access to millions of reviews and ratings for companies

Modify the Orientation of the Page
For your papers, you may select between two-page orientations: portrait and landscape.
- After opening a Google Docs document, click the edit button, which appears as a pen icon in the lower right corner of your screen.
- Select “Page Setup” by clicking.
- Select an orientation type by selecting the orientation option.
- Portrait: This is the standard orientation choice for documents with a vertical layout or those that are taller than broad.
- Landscape: A document with a horizontal arrangement or that is wider than tall is referred to as having a landscape orientation.
- Click “OK.”
- Modify the Page Size
- Edit > Page Setup
- Select the paper size by clicking.
- From a list of standard page sizes, choose a paper size.
- Press OK.
- Page Color Modification Edit button > Page Configuration
- Select the choice for page color by clicking on it.
- Select the color of the page.
- Click “OK.”
On different gadgets: How to change margins in Google Docs
Using an iPhone
Change margins on an iPhone by following the instructions below:
- Get your document open. Find the menu button in the upper-right corner of the screen (it appears as three dots).
- Select Margin under Page Setup.
- Select from options for broad, narrow, custom, or default margin configuration.
You may input precise measures for your papers with the aid of the custom margin. For wide margins, use one-inch top and bottom margins and two-inch right and left margins. Using default margins, you may set all of your margins to one inch. To establish half-inch margins on all four sides, use narrow margins.
With iPad
- Locate the Menu and Page Setup option from the drop-down list on the iPad to adjust the margins. The remaining procedures for modifying margins on your iPad are comparable to those on an iPhone.
How to include margins of liberty
If you’d like to eyeball your margins, you may click and drag in the gray area of the ruler at the top of the page to adjust the left and right margins only—not the top or bottom.
The reign of fashion
- What should you adjust the margins to on your document now that you know how to do it? Consider leaving the margins alone if you’re writing an academic article. One-inch margins on all sides are required by the APA, MLA, and Chicago style guides, as well as by many colleges.
- Even though a style guide is not mandatory, there are some fundamental rules you should follow when setting your margins. The most crucial rule is to keep the total number of characters (including spaces) on a line to a maximum of 90. Setting the margins (which should be equal on the left and right) and selecting a distinct font and font size are necessary to create this work.
Create with the reader in mind
- Additionally, margins make printing your document simple. If you reduce the margins on your resume in an attempt to fit more information on one page, you will probably lose some space on one or more sides when printing it for yourself or a prospective employer.
- However, if you increase your margins to increase the number of pages in your term paper, your teacher may utilize that additional space to provide you with some pointed corrections on formatting. Ultimately, you want to make it as simple as possible for your readers to read what you’ve written.

How to Adjust Google Docs’ One-Inch Margins
Institutional papers often demand Google Docs with one-inch margins. Using the Page Setup option, you may adjust your margins to one inch by doing the following steps:
- Navigate to the document’s File menu.
- Select “Page Setup” by clicking.
- There will be a pop-up window. Put one for each of the four margin values.
- To save and apply the changes, click OK.
- Making Use of the Ruler
- Navigate to your screen’s ruler.
- Click the View tab and select the Show Ruler option if the ruler isn’t visible.
- To change the margin to one inch, click and drag the ruler.
In summary:
To sum up, Google Docs allows users to adjust document margins to suit different formatting needs for personal, professional, or academic projects. Setting the how to change margins in Google Docs is a simple process, whether you’re following company or teacher rules or just personalizing the layout to your tastes. The Page Setup dialog box and the ruler are the two ways to adjust margins that have been described in this article. Users who are knowledgeable about these techniques can produce papers that adhere to particular formatting requirements.
FAQs: How to change margins in Google Docs
In Google Docs, why would I need to change margins?
It may be essential to modify margins to meet the demands of your teacher or your company for papers, projects, and resumes. It lets users alter the document layout according to predetermined standards.
Is it possible to customize the margins on individual Google Docs pages?
No, you cannot presently adjust various margins for individual pages in Google Docs. Any changes made will be applied consistently to every page of the document.
To change margins, how can I access the Page Setup dialog box?
Click “File” in the toolbar, then choose “Page Setup” from the drop-down menu to open the Page Setup dialog box. You may change the margins by entering new dimensions for the top, bottom, left, and right sides in the Page Setup box.
What is Google Docs’ default margin setting?
Google Docs has default margins set to one inch on both sides. Users can modify these parameters, nevertheless, according to their own needs.
Can I set the modified margins as the standard for all the next papers I create?
In the Page Setup dialog box, users can select “Set as Default” after altering the margins, and then click “OK.” This makes sure that all upcoming papers will use the updated margin settings, but it does not affect currently in-use documents.