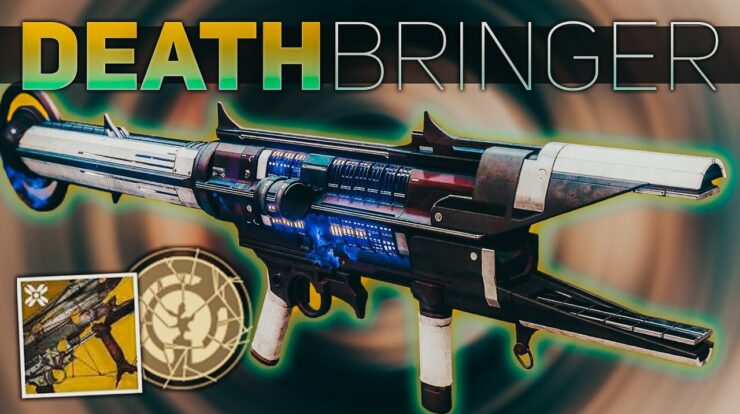
The Memory of Sai Mota is a special mission in Destiny 2 that allows you to earn the powerful exotic rocket launcher known as Deathbringer.
Deathbringer Overview, Perks and Stats
If that excites you, allow me to guide you through the extensive process of unlocking the Deathbringer. The intricate quest chain begins with the Memory of Sai Mota quest, which you will receive after completing the entire Shadowkeep campaign.
Deathbringer in Destiny 2 stands out from other rocket launchers due to its unique charging and firing mechanism. By holding down the trigger, you charge the weapon to release void orbs that will track down enemies. The farther the orbs travel, the more powerful the explosion upon impact. This item is referred to as “exotic” because it is difficult to obtain, requiring dedication and effort to unlock. However, the rewards of obtaining and using Deathbringer are well worth the time and effort, offering a thrilling and explosive experience.
Preparations
Before moving on to the next stages, you must first finish the Shadowkeep quest.

Complete the Shadowkeep quest first
There are no specific requirements to prepare for the questline, but it is suggested to have a power level of at least 900 before starting. The Deathbringer is a +5 powerful drop, so it will drop at a level five points higher than your current power level. If you are below 900 power level, you may not fully benefit from obtaining this powerful weapon.
How to Unlock Deathbringer in Destiny 2?
Complete the “Lunar Spelunker” bounty by exploring three out of the four Lost Sectors on the Moon. Start by going to Archer’s Line and defeating the bosses at K1 Logistics in the western area to loot the chest. Then, head to Anchor of Light for K1 Communion in the east, making sure to eliminate all enemies to reach the chest. Lastly, go to Hellmouth for K1 Crew Quarters, located in a tunnel inside a white building with the Aeronautics of China logo. Follow the same process of defeating bosses and looting chests to complete the bounty.

Complete the Lunar Spelunker bounty
After finishing Lunar Spelunker, you will receive a Firewall Data Fragment. Go to Sorrow’s Harbor and enter the Lost Sector. You can avoid fighting the enemies and simply run through this part. It is not necessary to complete the Lost Sector to progress. Make your way to the core vault location in the K1 Revelation Lost Sector. Watch out for a large, broken walkway on the right side of the map. Jump up and walk through to find an encrypted glass door that requires your data fragment to open. Once unlocked, you will receive Sai Mota’s Broken Necklace.

Firewall Data Fragments Destiny 2
The next part of the Memory of Sai Mota quest involves defeating Nightmares using Arc abilities. Some players have had difficulty with this task, so be sure to focus on yellow bar Nightmares and use your arc abilities for the kills. Regular arc weapons or melee attacks won’t count. It’s important to land the killing blow yourself, especially when facing bosses with a team. Using grenades or supers can help make the task easier. If you have access to Nightmare Hunts, that’s a good option, but otherwise, you can find Nightmares around Sorrow’s Harbor. Defeating a Major Nightmare will give you two necklace scraps, while an Ultra will give you three. You’ll need a total of twenty scraps to progress further in the quest.

Defeat 20 Nightmares, commonly located in Sorrow’s Harbor.
After reaching your target, give yourself a pat on the back and head back to Eris at the sanctuary by going through the portal located to the south of the moon. Give back the necklace and watch the cut scene that comes next. Open the chest to receive your reward and the next quest step, “Faculties of the Skull.”
Eris will guide you to the Circle of Bones located beneath the Hellmouth. You can activate a quest marker for the Faculties of Skull mission.

5) Return to Eris once more to finish Marrow’s Elegy. Participate in Hellmouth public events to collect Festering Bones, complete K1 Revelation to find Ritualistic Bones, and search for the Bone Collector in the Anchor of Light area for Bone Collector’s Marrow. Start your search for the Bone Collector around the Anchor of Light.

Eliminate the Bone Collector in order to obtain their marrow Destiny 2.
Next, you will need to beat High Conductor Sulmakta during the Scarlett Keep strike. Continue playing until you reach the elevator, then get off at the second stop to locate Sulmakta.
7) Upon completing the Scarlett Keep strike, there are three necessary steps to complete “Of Darkest Harmony”. These steps entail defeating numerous enemies, notably:
- 700 normal enemies
- 110 elites and mini-bosses
- 50 guardians
Performing these tasks on the moon will give you extra progress.
8) After gathering the screams of the enemies you defeated, you will return to the Circle of Bones for your next quest. Head to the Catacombs to track down the Deathsinger. You will need to “Survive the Arias” from enemies who sing for 60 seconds. Defeat them within the time limit and chip away at their shields. Look out for debuffs and eliminate them by destroying the corresponding wizard’s shield. Finally, take down Ir Airam, Deathsinger. Although the recommended gear score is 920, many believe this fight may be easier than that, so don’t stress if you’re not quite at that level when you start.
9) After charging the skull, bring it back to Eris to receive your Deathbringer Exotic Rocket Launcher. You can look forward to using one of the most distinct weapons in the game, which launches projectiles containing void orbs. Aim upwards for maximum effect, as the orbs will inflict more damage the farther they fall.